Hyper-V is one of the leading business solutions organizations seeking to optimize virtualization can use. However, you can’t enjoy any of its benefits before installing and configuring it on your hardware. Once installed properly, it offers excellent backup through its Hyper-V replication capabilities. Click here for more information. Therefore, this guide seeks to show you how to configure it on your computer hardware. Keep reading to learn more.
1. Hyper-V Manager Host Menu
This section of your Hyper-V menu offers you the necessary options for configuring your host. Your setup process starts here. You will need to start the configuring process by clicking on its Settings.
2. Virtualized Hard Drives and Computers
These two options let you alter your virtualized hard drive’s storage location your virtual machine will use.
3. NUMA Spanning
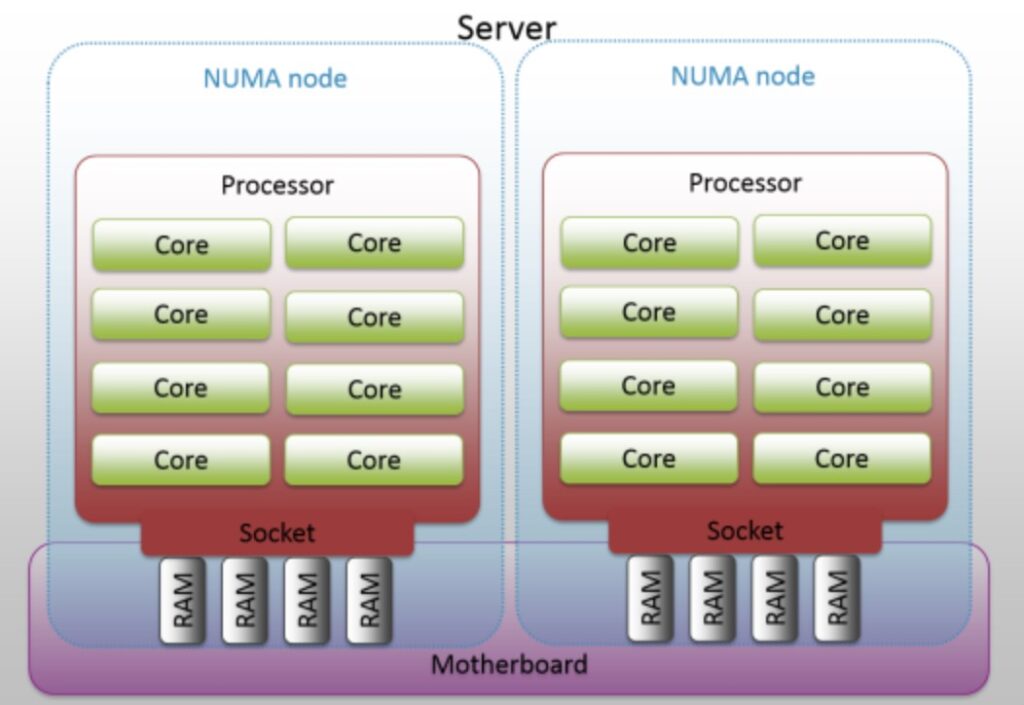
This choice helps you to set up your hosts to the server as NUMA (Non-Uniform Memory Access) nodes. Consequently, it lets your virtual machines utilize every resource your servers are on.
4. Live Migrations
This option assists you in specifying how many live migrations should happen at a time. It has a default of two, but you can determine how many you want.
5. Migrating Your Virtual Machines Live
This feature is critical in enabling virtual PC’s movement between hosts without downtime. You can also establish the number of migrations you want to take place simultaneously.
You will see a plus symbol adjacent to this window. Clicking on it lets you see a window for advanced features. Here, you will modify the type of verification you need to utilize while migrating your resources. You can also select the kind of performance choices you need. These options are TCP/IP, Compression, and SMB.
6. Storage Migration
This section is instrumental in moving your virtual computers but without needing to shut down the virtual PCs. It is also highly beneficial for transiting to a new storage location. It’s also beneficial when readying to execute storage quarters’ maintenance since you can migrate storage without shutting down the VM. Here, you determine the number of storage migrations you can permit at a given moment because the original settings fix them to two.
7. Enhanced Session Mode Policy
This policy lets your hosts connect to virtual computers using the Remote Desktop Protocol. The reason for this connection is that when using it to interlink your machines, you can bypass other local devices to your virtual machines, such as drives and other removable devices. It also lets you access a shared clipboard that allows for copying and pasting. Moreover, it enhances the support that lets you view your virtual PCs on monitors with advanced resolutions. When using a Windows Server 2019, it’s critical to activate it if you want to use it because it’s’ deactivated in the server’s settings.
8. Configuring the Replication
You can also configure your hosts to the server as replicas. By configuring them to the server as replicas, you can copy your virtual machines from the parent servers. Should the parent server fail to function well, the replica will activate the virtual computers that were shut down.
Here, you can clarify if you need your duplication traffic to be transmitted in the form of text or codes. We strongly suggest you encrypt your traffic when it’s possible. You might also choose if you need to permit the duplication from other servers that can verify or if you wish to confine the replicating process to specific servers.
9. Configuring Hyper-V Replica Servers
It would help if you took this stage seriously because it’s critical to your business’s data recovery plan. Remember, if you fail here, you will not gain much from your installation.
10. Configuring Your Keyboard
This screen is included in your user configurations. Here, you might determine whether combining specific keys will affect the computer hardware it’s connected to or the virtual machine. Choose it when the virtual machine is full-screen.
11. Mouse Release Key
If you are still waiting to install virtual PC drivers, you might need to choose which keys you wish to combine to unleash the mouse to let you utilize it from the virtual machine. Install these drivers unless you feel you don’t need to.
12. Enhanced Session Mode
This mode is already activated for use. It lets you utilize remote desktop connections in passing through any device, such as a printer or drive. It also enables you to utilize the virtual machine’s clipboard.
13. Resetting Checkboxes
This configuration is only useful in resetting any checkbox you use in hiding a page or message after checking it.
14. Virtual Switch Manager
Right-clicking on your Hyper-V host lets you see this option. It’s essential in creating any virtual switch your virtual computers might need in communicating on your network. A switch might come in any of the following forms:
- It could be external to assist you in connecting to physical networks;
- It could also be internal to assist your virtual computers in communicating with other virtualized machines on the same switch and with hosts;
- Lastly, it could be private to assist your VMs in communicating with other VMs on a similar switch.
So, you should have the correct form of switches to assist your usage. Otherwise, your deployment could fail.
15. Hyper-V Switch manager
You also need to attend to this manager because it’s critical in configuring your virtualized network switches for your virtualized ecosystem.
16. Virtual SAN Manager
This manager is another critical component you should configure. It helps connect to your hosts to Fiber Channel SAN. This feature is essential for big companies that invest in this technology. This tech is beneficial because it uses specialized switching tools in supporting a super-fast storage network. Any system that utilizes it needs to install specialized storage adapters to function well.
Configuring your Hyper-V is a necessary and straightforward process any administrator can learn. It assists you in connecting to and reaping benefits from the Hyper-V ecosystem. We hope the processes in this guide will be useful in assisting you to configure its various Hyper-V components.


