Since the launch of Windows 8 officially on October 26th, I have seen many people searching ways to install Windows 8 on their Android running tablet PCs. So, I thought to share a method that I used earlier dual booting Win8 Consumer preview with Android. If you want to do the same, make sure your tablet config is compatible enough for dual booting and running windows 8. We will talk about this later in this guide, first let’s see How to Dual Boot Android + Windows 8 on same Tablet PC. Here it is:
Creating Bootable Pen Drive for installing Windows 8 on Tablet:
First of you will need few things to complete the process. So before we start download Wind8 ISO file and save it somewhere on your desktop. Other than you will require “Windows 7 USB/DVD download tool”, you can download the same from here and save it on your desktop. You will also need Two USB Flash Drive / Pen Drive (4GB each) to install the operating systems by making them bootable. Once ready with all these things, follow the below steps:
- Start with installing the Windows 7 USB/DVD download tool on your computer. This is because we need to make a bootable Windows 8 pen drive first.
- Take a Pen drive and format it.
- Now run Windows 7 USB/DVD download tool, click Browse and select Windows 8 ISO image
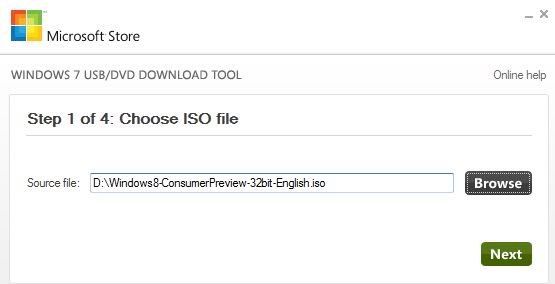
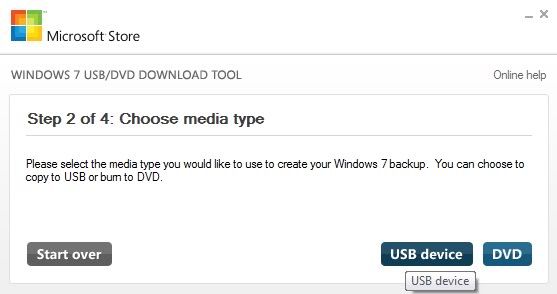
Click next and on the next screen Click on “USB Device”.
On the next screen, select your Pen Drive properly and click “Begin Copying” button as shown in the image below:
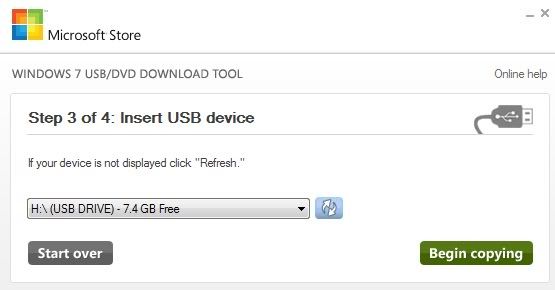
That’s it. Now wait until the tool copies all files and create the drive bootable.
Shrinking Partition on Tablet PC:
Obviously if you want to install two operating systems on same tablet, you will need to create two partitions on your device. There are various tools using which you can do the same but so far I have used two of them, “Parted Partition” and “AmonRa”.
I will suggest you to go with Parted Partition as it is simple to use and will work better in this process. Now as it will take long time to mention all steps here with images, instead I found an article describing the same. So you can just check it here and follow the steps provided to partitions on Tablet. Once done, come back here and follow the next steps.
Installing Windows 8 on Tablet (Partition 1):
Now we are ready to install Windows 8 on the tablet. To do the same Turn off your laptop and follow the steps:
- Connect bootable Win8 pendrive with the tablet
- Now boot your tablet into recovery mode and select option “boot from USB”. Every tablet has several ways of booting into recovery mode, you will need to find how to do it on your tab. Usually it use to be Home+ Volume+ power button.
- Once your Tablet will boot from pendrive, you will see the Windows 8 installation screen.
- Now you know what you have to do. Just follow the onscreen instructions and install it on proper partition.
Creating Android x86 Bootable Pen Drive:
Now as we are done with Windows 8 installation on your tablet, its now time to prepare Android for the same. Here you will need to gather few things, such as “Android x86 Atom image” and “LinuxLive USB Creator Tool”.
You can download Android x86 Atom image from here and LinuxLive USB Creator tool from here. Both of these softwares are open source.
- Once done, Install Linux Live USB Tool.
- Connect your Second Pen Drive the computer.
- Run LinuxLive USB Creator tool and select your Pen drive from the first drop down option.
- Select the Android x86 Atom image in the source option.
- Select other preferred option and click on the last lightning icon to create the bootable drive.
Check the following Image for more help:
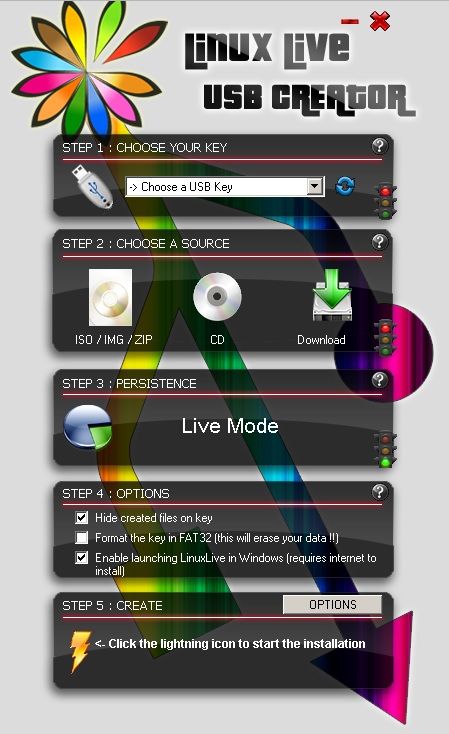
That’s it, you should be ready with your Android Bootable Pen drive after few minutes.
Installing Android on your tablet:
As you are ready with Android Bootable drive, just connect the same with your Tablet and reboot it Recovery Mode. Now follow the same steps as we did above while installing Windows 8.
Just don’t forget to install GRUB Boot Loader as well while installing Android as dual boot. Once installation is completed, you will able to set default operating system while bootup using USB keyboard later.
Hope this helps.

