
Samsung Galaxy Y is the entry level Android smartphone and one of the best budget phone in Samsung Android devices. We already posted tips for installing NextToICSROM (Custom ICS ROM) and Aura (ICS Custom Rom) on Galaxy Y S5360, today we are going to show you how you can install latest Android version “Jelly Bean” via Custom ROM called “JellyBlast.”

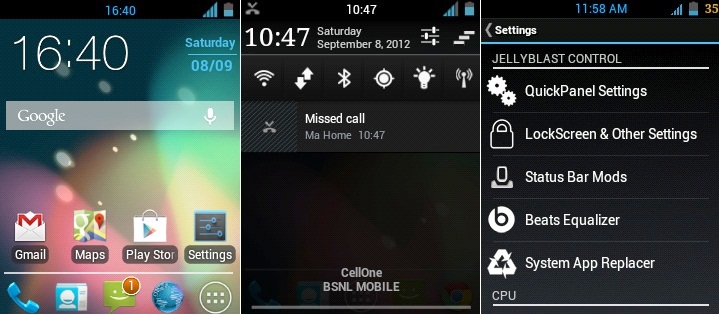
Just checkout how your Samsung Galaxy S looks with this new Jelly Bean based Custom ROM:
Pre-requirements:
There are few important stuffs you need to take care before installing Custom ROM on any device. Here are few of them.
Download JellyBlast (JB) Custom ROM from here.
- Make sure your mobile’s battery is charged atleast 70%, it should not get empty during the process as it may brick the device if got shutdown due to battery.
- And the most important thing, you should be aware that doing this will break your device’s warranty.
- Note: The guide provided below is 100% correct and works but we are not responsible for any thing (if) goes wrong with your smartphone.
OK, so if you are ready with all above points, lets start the installation process of JellyBlast on Samsung Galaxy Y S5360:
Rooting Galaxy Y:
In order to install this Custom ROM your device must be rooted. If your mobile is not already rooted, you can follow the steps provided in the following URL: Easiest Method to Root Samsung Galaxy Y S5360. Rooting is also very crucial so don’t make any mistake and follow the steps properly.
Installing ClockworkMod on Galaxy Y:
This is another important thing you need to do on your mobile if you already don’t have CWM installed. ClockworkMod is required to boot the device with the new kernel which we install during the JellyBlast installation. So make sure you have CWM recovery installed on the phone. If you don’t know how to do the same, follow these steps:
- Download the CWM file from here. Its just 1.4 MB in size.
- Transfer it to your mobile SD Card’s root directory via USB cable.
- Turn off Mobile and Press+Hold Power + Home + Volume Up button simultaneously. Hold them for about 10 to 15 seconds until you see the logo.
- Now scroll with volume up/down buttons and select “update zip from SD card” option.
- Browse and select the download CWM file.
- Wait for few seconds and you are done.
- Now we are ready to start JellyBlast.
Installing JellyBlast (JellyBean) Custom Rom:
Once you are ready with Root Process and CWM Recovery, also make sure that your phone is on Stock kernel (factory version). Now follow the below steps.
- If you have any second partition on your mobile, just format the same and delete a2sd or data2sd.
- Now Copy Paste the JellyBlast Custom Rom file into your phone’s SDCard. Make sure to put it in Sd card’s root directory so that it can accessed easily during recovery. (Downloaded in Pre-requirements section above).
- Now turn off your mobile and press+hold Power+Home+Volume key to boot into CWM recovery mode.
- Scroll with volume keys and click on Wipe data and cache
- Scroll again and wipe Dalvik cache.
- Now select “Install Sip from SD Card”
- Browse and select “JELLYBLAST V3.signed.zip” from SD card.
- [li]Wait for few minutes and let the ROM install. Once installed you will see confirmation message on your screen about the same.
- Once done, go back to main recovery page and select Reboot.
That’s it. You have successfully installed Jelly Bean based JellyBlast Custom Rom on your Galaxy Y S5360. The first boot will take some time to initialize the new rom, so don’t panic.
Enjoy !!


