
Microsoft Band is a new wearable device that brings a lot of features with touch screen support. Yet it is not known to many. It can be a ideal tracker for your health and fitness workout. It is also very easy to use and works well with Windows phone. But at the first time when you have it you might get confused in using the same. So here I am going to give you a detailed guide with all the features that you can apply and get an effective usage from the same. This band has a UV sensor and has a heart rate monitor also. It is ideal for getting notification. It is must more than a regular watch. Let’s see what more we can do with the same.
The Hardware:
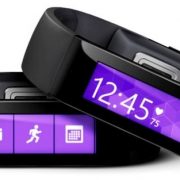
Microsoft Band looks very classic. It has a rectangular shape touch screen on the front that is easy to use. There are two buttons on the body that will help you in navigation. There is a UV sensor also on the watch with a mic. And there is a charging port with heart rate monitor. A few more things that this watch has is a GPS device and accelerometer. These two things are not visible. They are in the band. The bottom part has a clasp snap which can help you to adjust the width while wearing it.

A few things you have to do before using the same:
- Just check that there is maximum charging in the band. You can put it on charge if it does not turn on.
- Ensure that it fits well in your hand. Don to wear it loose. You can do that by adjusting the clasp snap.
- It is comfortable to wear but fitting is necessary so that it does not fall.
- When you connect the band first time no charging and turn it on an initial setup will start for first configuration.
 Using Microsoft Health App:
You have to simply download and install Microsoft Health App in the device with which you are going to use the band. It is available on Windows store. The same app is also available for Android and iOS devices. Then you have to follow the below steps to configure it for usage.
Microsoft Band Pairing with Smartphone or Tablet:
The band is not going to work unless you pair the same with your device. Here we are taking example of Windows device. You have to connect the same through Bluetooth connection. So that it can remain connected. Also if you are no Windows the benefits it that you can use the band on other Microsoft services like Hotmail, Outlook, OneDrive, etc. And there you need a single live account.
- First Power on band and then tap on Get Started.
- In your Smartphone or Table launch Microsoft Health. You will need to sign in with your Live ID.
- Now go in the phone settings and turn on USB. You will see MSFT Band in the list of Devices.
- Tap on the same to pair. You will get a pair code on the band screen and on the phone. Accept on both.
- That’s it. The band is now paired and ready for usage.
Notes: If your device is unable to find the Band in Bluetooth try to keep your phone under discoverable mode. You can also restart the band for fixing the problem. You have to tap on the action button in the band so that the process can go ahead. It is on the right side of the band. Sometime Microsoft Health App might ask you to install a few updates. Allow the same.
Personalizing Microsoft Band:
Personalization is the part where you assign your own settings in the band for easy usage. And it is simple to do. It is the next step when you are done with the pairing part. Here personalization is necessary. As you have to provide a few detail about yourself. So that the band can give you more effective stats about your health and fitness.

Step 1:Start from creating a profile. Add details about yourself, like age, height, weight, etc. Then you have to set your fitness goals here. So that you can start them anytime you want. The band has a touch screen which is allow you to edit things directly. But you can use Microsoft Health App for the same.

Step 2: After hitting the power button on the tap you will see a Tile based UI on the band screen. this is scrollable. You can see more options as you keep on scrolling. This is called as MeTile. And the first screen is the start stip. Here when you tap on message you can see a glimpse of emails, you can tap on calendar, workout, etc. You can do following things through that:
- Hit the action button if you are going for a cycling tip. It will give you a details of distance you had travelled. It will also give you detail about the calories you had burned and your current heart rate.
- By dragging the same to right you will see a status bar which gives you a battery indicator with heart rate monitor. It will also show you the Bluetooth status.
- You have to tap on Run Tile icon when you are going to start jogging.


